Sunday, June 30, 2013

How To: Build a Fire Pit

Remember when I told you guys that we bought that huge above-ground pool? Yeah, well we already got rid of it--and by 'got rid of it' I mean 'drained and slashed it then threw it away.' Turns out that the pool just couldn't handle the Murrieta heat. We had chemicals in it and were constantly cleaning it--and it turned green (like, swamp green). It was disgusting. Even the kids were grossed out. So, Joe and I decided to get rid of it. I debated trying to sell it on Craigslist--considering we only bought it 5 weeks ago and it was in perfect condition--but once we got all of the water out of it and saw how dirty it actually was, I decided not to. We had such an amazing time together as a family last summer, and even though summer is just getting started, we could already tell that it wasn't the same. We decided to bring back our old-smaller pool that was loved so much last year :).

Once the gigantic pool was down, we were left with a "crop circle" of dead grass where the pool once was. We knew that we were going to have to sod it--and we've talked about building a fire pit for well over a year now--so it was the perfect time to do it. The fire pit alone cost $50 to build (and we spent about $60 on sod to get rid of that circle of dead grass).  Have you been debating building a fire pit in your backyard? I can honestly say that it was ridiculously easy--took us about 15 minutes (laying the sod, however, took some time)--and looks great. We found a pinterest tutorial on how to make one but it was pretty vague--so we figured it out ourselves. Here's how we did it: 


FIRST AND FOREMOST: make sure the kids are occupied so they aren't in your way ;)

See--totally a crop circle in our backyard ;)

The supplies...

The sod...

Make your beginning ring: these specific blocks have a 'lip' on them--make sure that 'lip' is faced UP; it'll give it a nice finished look when you're done building it (we got about halfway done building it then realized that we needed to flip them over). 

Offset the blocks and just stack them! You could concrete them together if you wanted to but its not necessary: these blocks are HEAVY and they aren't going anywhere!

After the sod was laid! I'm in love with how it looks!

We finished off the look by putting lava rocks at the bottom of the pit (don't mind the discoloration: Joe was in the middle of hosing down the sod while I was taking the pictures; some of the rocks got wet). 
The blocks that we bought were $1.28 a piece, and this fire pit needs 33 blocks (these specific blocks come in a few different color choices; we bought them at Lowes). Once your fire pit is all set up, the size of it should fit a standard fire pit bowl that you can buy anywhere; we have one but its pretty rusted and dirty so we decided to leave it out and just have this be a "bonfire" style fire pit :) I cant wait to make some s'mores with the kids tonight!!

Saturday, June 29, 2013

Zucchini Chips

Do you have problems getting your kids to eat vegetables? Well fret no more--I have the perfect solution. What kid doesn't like eating chips?! None. Well, I'm sure there's a weird kid out there that doesn't, but this blog isn't for them.

The other day, my friend came over and gave me this gigantic zucchini that her brother's wife grew in her garden. I don't think I had ever seen a zucchini this big--it was almost as big as her 7-month-old son! This thing was huge--and I needed to think of a way to use the whole thing up before it went bad. And then I remembered that I had pinned something on Pinterest about making your own chips. Boom--sold. I love chips, but since I'm always watching what I'm eating now, I usually only eat them on special occasions. Well, not anymore! I could eat these things all day; they're delicious, and SO easy to make! They're time consuming to make (in the sense that it takes them a while to cook in the oven), but the actual prep work goes fast.

Do you see how big this thing is?!


Here's what you'll need:
-however many zucchinis you want (I suggest buying bigger zucchinis; they shrink a lot!)
-olive oil
-salt (I used kosher salt)

Slice them up real thin...

Blot with a paper towel then lay out on baking sheet...

Brush with olive oil then sprinkle with salt...

Preheat your oven to 225* degrees. Slice your zucchinis very thin, then sandwich between paper towels to remove the excess moisture. Line up on a baking sheet (I suggest using parchment paper; my first batch baked right onto the cookie sheet and I had to scrape them off). Brush with olive oil then sprinkle with salt. Bake at 225* for 2+ hours until they are dry and crisp. (Once they are out of the oven and cooled, I'd recommend placing them on a paper towel to soak up any excess olive oil).

Friday, June 28, 2013

PSA: Be On Time! (and tips on how-to)

That's right: I'm doing a public service announcement. There is NOTHING I hate more than someone who is constantly running late. It's fine if its once or twice--but if people start needing to tell you that (the event) is (x-amount of time) earlier than it actually is, then you have a problem. Its not okay to chalk it up to "ohh haha, I'm never running on time." Its rude and inconsiderate. Parents of small children are the worst at this. They think that because they have a kid, its okay to show up late to everything. I'm not talking about the occasional "oh my gosh, THIS happened right before we walked out of the door." --I'm pretty sure we've all had that happen. I have TWO young kids AND one arm--yet I still get all of us ready and out the door on time EVERY time. Yes, I'm a very organized person, and of course that helps a lot--but I think parents seem to think "oh it only takes me 15 minutes to do my hair--then we'll be on our way." If a task normally takes you 15 minutes to do without kids, then plan on it taking an hour with kids. In the morning, when I'm getting ready, I cant even count the amount of times my kids come running up to me tattling, crying, or anything in between, and it stretches out the amount of time it takes me to get ready.

When Joe and I have somewhere to be, he always asks me what time I'll need to start getting ready (so that he can be sure he's ready by then and can watch the kids while I get ready). That's what a marriage is--its a partnership. Here's some steps to get you moms ready and out the door ON TIME:

1. Plan ahead. If you know the night before that you're, say, going to a picnic lunch play date, then make the lunches the night before. That way, if something goes wrong in the morning, you wont have to scramble and get food ready, therefore causing you to be late.

2. Say it takes you an hour to get ready and you're supposed to leave the house at 10:00. DO NOT start getting ready at 9:00--start getting ready at 8:00. Being on time isn't always beautiful--you may have to wake up earlier than you planned--but your friends and/or family will appreciate it. 


3. Have the diaper bag packed and ready to go at all times. I cant stress this enough. I cant even count the amount of times I've met up with friends who were late because they couldn't find (whatever it was) that was supposed to be in the diaper bag. Keep it stocked and ready for anything. If you do two diaper changes throughout the day while you're out and about, then as soon as you get home, stuff two more diapers back into the bag to replenish it. God forbid you're far from home one day without any diapers or wipes.

4. Set realistic times to meet up. If someone tries to get together at, say, 7:00 am, I say hell no. There's no way I could get up early enough to get myself and two kids fed and ready for the day at that time. If you set realistic times to meet up, you'll be more likely to stick to that time. 


5. If need be, pick your kids' outfits out the  night before. There's nothing worse than a toddler throwing a fit in the morning because she doesn't want to wear that dress. If you go through the outfit-picking-out stage the night before, then it wont be an issue the following morning.

6. Nap time. I get it--all of our kids nap. Don't set up a time to get together if its around your kid's nap time and you aren't willing to A.) skip it or B.) wake your kid up. I'll never forget the time I was stood up at the park for a play date because her daughter was still napping and she didn't want to wake her up. This was after the time we were supposed to meet up--and I was already at the park. Are you kidding me?

...If its an occasional thing for you to be late--somewhat of a rare occurrence, then that's fine. Like I said earlier, we've all had those days. If you don't have young kids and you're still always late, then you need to take a good look in the mirror and figure out what the issue is. Don't think I'm pissed at you for being late that one time. But if it happens every time--you'd better believe I'm irritated. I may or may not make it known, but here's your warning. Its not rocket science people--if I can do it, then you can too. Punctuality is key--if I rushed to get myself and my two kids up and ready for the day so that we could be on time and then you just stroll in whenever, its basically like telling me "I don't respect you or your time." ...and I don't like that one bit. It really isn't a hard concept--I'm always on time, if not early--you just have to make it a priority. :)

Thursday, June 27, 2013

Cucumber Dill Greek Yogurt Salad

I guess I've been on a "side dish craze" these past few days because that seems to be the only new recipes I've been trying! I'm always looking for something light and refreshing--and this cucumber dill Greek yogurt salad is just that. Doesn't take too long to make and is perfect to accompany your grilled chicken or burgers (or, in my case, turkey burgers)--a perfectly healthy meal. 

Peel, slice, and seed your cucumbers

Add your yogurt mixture

Mix it all up..

...and viola! Your cucumber dill Greek yogurt salad is ready to eat!
Ingredients:
4 large cucumbers (about 2 pounds)

4 Tbsp of plain Greek yogurt 
1 Tbsp of dill
1 Tbsp of rice vinegar (substitute red or white wine vinegar if needed; I used white wine)
1/2 tsp. of sugar

1/2 tsp. of salt
1/4 tsp. of black pepper
1/4 tsp. of garlic powder

Instructions:
1. Peel, slice, half, and seed the cucumbers. For this step I used my melon baller to get the seeds out--made it very easy and made the cucumber have perfect 'arches.' 


2. In a medium bowl, combine yogurt, dill, vinegar, sugar, salt, pepper and garlic powder.

3. Add cucumber to bowl and toss with yogurt/dill mixture until combined well.

4. Add additional salt and pepper to taste, if needed.

5. Refrigerate covered until ready to serve. Enjoy!

Wednesday, June 26, 2013

Beat the Heat!

Summer is here and it is in full swing! This weekend its supposed to reach the 100's and I'm already starting to get anxiety about it. Can we just fast forward to Fall? No, I kid.. but really. Summertime is bittersweet to me: I love hanging out by the pool with my family every weekend, but with summer also comes fruit on our trees. Sounds great--but its more of a hassle. We have a nectarine tree that produced HUNDREDS of nectarines last year--we couldn't keep up with it. The fruit eventually just started falling off the tree, and at one point I went outside to pick up the fallen fruit and counted 256 on the ground--that's not counting all of the fruit that we had picked off the tree, eaten, made jam with (my husband is a jack-of-all-trades: we had so many nectarines that he got creative and looked up a recipe to make nectarine jam.. it turned out so good that we jarred it and handed it out to family). We promised ourselves that we would keep up with the tree this year--even if we weren't going to eat it, we'd pick it and give it away to neighbors (or whoever wants them). I know it doesn't sound like that big of a problem, but with fruit falling off the trees, the squirrels get to it and eat half of them, leaving the other half for bees. Ah! That alone is reason to keep up with all of this fruit. Anyways, our nectarines are almost ready to be picked, and we're going to have to start getting creative with what to do with it. 

We also have an apple tree--last year it didn't produce much fruit, but this year there are already TONS of apples almost ready to be picked. I've already got some plans for those: I've pinned some apple butter recipes on pinterest that I'm excited to make. 

Now that the heat is here, I'm finding that I have to get creative with our time. I don't want to be outside all day (like I said earlier, its supposed to reach the 100's this weekend), but I also don't want to spend all day inside in the AC (okay, wait, that sounds kinda nice.. but the kids don't like it). If you're in the same boat as me and have no idea what to do to occupy your kids, here are a few cheap ideas to keep them happy:
  • Obviously, first and foremost, find a community pool if you don't have one accessible to you. We bought an above-ground pool this year so I know we'll be spending a ton of time in that. 

  • Find a local splash pad. We have a few that we can go to; a small one at a park down the street from my house, or a HUGE one at a campsite about 10 minutes away from my house (it costs $6 for a day use--totally cheap). These things are an AWESOME way for kids to stay cool (and to run around and get all of their energy out!)


  • Find a local trampoline park. I know, I know--I wrote a blog about this the other day--but these really are a great way to get your kids energy out and stay out of the heat. These places are cheap to get into and a lot of them have coupons and groupons that you can buy. 

  • Chuck E. Cheese. I know--sounds kinda awful--but this place is usually pretty dead during the week. I didn't realize how cheap it was to take my kids there; we went and spent about 4 hours there and I only spent $20--that's pretty good! The kids had a blast, I didn't break the bank, they were worn out, and we were able to stay out of the heat!
  • Take your kids to the movies! Not sure whether your child will do okay at a movie? Find a theater that plays older movies. We have a theater down the street from our house that plays movies that were recently in theaters, but no longer in them anymore. The tickets are really cheap--about $3 a person--so if your kid throws a fit and you have to leave, its not like you'll be out $30. Win/win. :)
  • Arts and crafts at home! Its never too early to start planning for Christmas. Do you plan on making a hand print plate for grandma? Or salt-dough hand print ornaments for grandpa? Do it now! You'll be occupied inside with an activity, and it'll give you plenty of time to perfect how it looks--or, if it turns out a disaster, plenty of time to shop for a new gift ;)
  • Frozen yogurt! My kids are obsessed with this stuff--its totally a treat when we take them to go get some. It gets you out of the house, you can choose however much money you want to spend there, and your kids will LOVE it!
I fully intend on utilizing all of these ideas this summer to keep my kids occupied. Its 3 months until Fall--so that's plenty of time to make lots of memories. Make this summer the best summer you've ever had <3

Monday, June 24, 2013

Healthy Egg Salad Sandwiches!

I love sandwiches. Turkey, chicken salad, egg salad--anything. This egg salad sandwich is actually HEALTHY because it isn't mayonnaise based (although there is a tiny bit of it). This entire batch was only 642 calories (not including the bread) and it made 4 sandwiches--which came out to 160 calories (380 calories including the bread*). That's one low-cal lunch or dinner (and I'm actually full from it!).  This recipe only takes a few ingredients and is great for if you're in a pinch. 

Plain Greek yogurt, fresh dill, mayonnaise, eggs, and salt and pepper are all you need!

Ingredients:
8 hard boiled eggs, peeled and chopped
1/3 cup of plain Greek yogurt
1 Tbsp. mayonnaise (I used light to keep the calories down)
1 Tbsp. of fresh dill (or 1 tsp. of dried dill)
salt and pepper to taste

Directions:
Boil, peel, and chop the eggs up. In a separate bowl, use a fork to whisk together the yogurt, mayonnaise, dill, salt and pepper. Add the chopped eggs and mix lightly with the fork until well combined. Eat it straight out of the bowl or serve as sandwiches.. either way it tastes great! 


Yum! 


*For Joe's and my sandwiches, I served it on Milton's Multigrain Bread, and for the kids sandwiches, I served it on white bread. It tasted good on the multigrain bread, but it tasted great on the kid's white bread. The calorie total using Milton's Multigrain Bread was 380 calories per whole sandwich, whereas the calorie total using white bread was 340 calories per whole sandwich. 

Enjoy! :)

Want to change up your cardio routine?

As a mom, I'm constantly looking for new activities to wear my kids out.. they have so much energy all the time, its hard to keep up! Yesterday we had a little "Sunday fun-day" --we woke up in the morning and decided we didn't want to sit at home all day. We surprised the kids and took them to the trampoline park next to our house (literally a 5-minute walk away). They had been there once before and LOVED it and had been begging us to go back ever since. If you want to get a great workout in AND wear your kids out at the same time, take them to a trampoline park. Here's a tip: you pay by the hour--and you'll always get a full hour--however, if you show up at, say, 12:15, they'll give you an hour and 15 minutes of jump time. When you show up, they give you a wristband with a specific color on it. Each of the different colors represents different hours. We got green wristbands, which represented 1:00 even though we got there at 11:45 (they announce "time is up!" every 30 minutes, and since we got there at a quarter to 12, we got an extra 15 minutes of jump time). Just a little way of "working the system" ;)

There is so much to do at these places. At this specific location, they have a HUGE adult area to jump in, and a smaller (yet still big) kids area to jump in (so that the kids aren't getting plowed down by the adults). Both the adult and kid areas have huge foam pits with trampolines in front of them for jumping into, and they are SO much fun! At this location, they also have a huge bounce house with a slide on it for the kids to play on. By the time your hour is up, you're exhausted (and the kids are ready for a nap!). Quick tip: if you do end up going to one of these places, wear workout clothes. You WILL be sweating within 10 minutes of jumping--its a terrific cardio workout and your body will feel great the next day ;)

This is the adult-area for bouncing.. its HUGE. There is also a huge adult foam-pit to jump into.. so much fun!

Maverick in the kids foam pit!

The kids area trampolines are huge too!

lol

Jump, Madison! :)

I love her big REAL smiles!

This place has a huge bounce house (with a slide) as well

Goin down the slide! 

After we finished at the trampoline park, we took them out to frozen yogurt (which ended up being their lunch (oops, but they loved it). After frozen yogurt, we headed home and swam for about an hour. Then it was finally nap time. Both kids ended up napping about 2 hours and 45 minutes--which, if you have kids, you know is heaven. 

Saturday, June 22, 2013

Roasted Red Pepper and Basil Pesto Penne

Summertime is here and the living is easy--the days are longer and everyone is more carefree. With this active time of year comes a certain livelihood where you lose track of time because you're doing stuff you love. More often than not, we are usually so busy doing something that dinner just seems to sneak up on us--and I have nothing prepared. I came across this recipe on Pinterest (what a surprise, right?), and just had to try it out. As an Italian, I love almost anything with the word penne in it--so my interest was immediately sparked. What I love most about this recipe is that my kids loved it.. it seems they're getting pickier and picker on what they like (not on what they eat--because I'll make them eat it regardless). They loved this and were asking me for seconds before they even finished their first bowl. This pesto literally takes about 5 minutes to make--you can do it while your pasta is cooking--and you can have dinner ready within 10 minutes. Boom--easy.


Ingredients:
3 cloves of garlic

1/3 cup of parmesan cheese
1 cup of roasted red pepper (fresh or jarred--I used fresh)
1 cup of basil leaves

1/2 tsp. of salt
1/4 tsp. of pepper
1/3 cup of extra virgin olive oil
1 lb. of penne pasta
1/4 cup of heavy cream, optional (I didn't use this because I didn't have it)

Instructions:
Place garlic in a food processor* and pulse until finely chopped. Add parmesan, red pepper, basil leaves, salt and pepper. Pulse until well combined. With the motor running, add olive oil through the feed tube and process until incorporated. Set aside.

Cook pasta according to package instructions. Drain and return to the pot. Add the pesto to the pasta and stir to combine. Stir in heavy cream if desired for a creamier sauce. Heat until warmed through. Serve immediately.

*I used my Magic Bullet to make this. I used the "blender" attachment instead of just the large cup so that I'd be able to add the olive oil through the feed tube on the top. Worked great :) 

This is a delicious pasta recipe that I'm sure your family will love--and you'll love how easy it is to make! 

Friday, June 21, 2013

DIY on a Budget

When we bought this house in September of 2011, there was a laundry list of things I wanted to change: anything from painting a wall in the bedroom to putting in granite counter tops in the kitchen and bathrooms. I think as a homeowner, the "honey do" list never ends. I'm always thinking up something new to change, and Joe just thinks that I'm draining our bank account. This is our home--this is the place we're supposed to feel warm and cozy--and as the wife, its my job to make it that. 

Some things are big projects that we have to save and plan for (I'd like to knock a tiny wall down in our kitchen to open it up a little more.. we'll see if that ever happens), but some things can be done on a whim in just a few hours. Take our downstairs bathroom, for instance. This bathroom was ugly. Bright yellow painted on all of the walls, flat black paint that was chipping off of the cabinets, and an 80's light and mirror. This bathroom was screaming for a remodel. Last summer was a 'get up and do it' type of summer for me--we were doing house projects every weekend. This was one of the projects that we did, and it was SO cheap but made such a huge difference. You don't always have to spend a fortune to spruce spaces up! 


Before: Bright yellow, ugly light and mirror.
(we had already painted the cabinets and put
hardware on them before I took the picture)
After: soft grey walls, nice light fixture, and
a pretty accent mirror. Huge difference--
seems way more tranquil.


First, we went out and bought some paint. Okay--Joe went out and bought some paint. I told him that I wanted a simple grey--not too light, not too dark--and I think he nailed it. I'm obsessed with this color. I wish he would let me paint my entire house with it--so far I've painted my entire bedroom this shade (putting the room together is still a work in progress--that'll be a post for later), I've painted the wall along my stairs this shade, and I've painted a wall in my front living room this shade. Joe thinks I'm going overboard; I think that its nice when houses are painted one color with an accent color here and there (whereas my house is painted about 8 or 9 different colors and it kinda drives me nuts). This paint color is called "Elephant Skin" and its by Behr Ultra bought at Home Depot, for anyone that's interested.

Once we had the paint, we just needed to pick up a few cosmetic changes--a light fixture and a mirror--and we'd be all set. We bought the light fixture at Home Depot for around $40 I believe.. and we bought the mirror at Hobby Lobby on sale for around $30 I think. Overall, we transformed this bathroom on around a $100 budget. So easy.

Joe took down the ugly light and the huge mirror, and 
I spent the day painting the bathroom (I'm kinda OCD when it comes to painting; I always tell Joe that I'll just do it because I'm worried he'll leave bare spots or something.. I know, I'm weird). I still have that mirror sitting in my downstairs closet and I'm determined to use it for something else since we were able to take it down without breaking it. What that is, I have no idea. Anyways--once the paint dried, Joe put up the new lights fixture and we figured out where we wanted the mirror positioned. In a matter of hours and not a lot of money, we were able to completely change the look of the downstairs bathroom. (Like I said in the picture caption, we had already painted the cabinets with a high-gloss black paint and installed hardware on them. Because they were previously painted, we figured we'd just paint over them instead of refinishing them like we did our kitchen and master bathroom).


These are 3D butterflies that you can buy at Target for $20. It's a little push pin that you stick into the wall that has a buffer in between the wall and the pin so that it sticks out, then you clip the butterfly on. You can turn and position the butterfly however you want to; and if you don't like the placement, its extremely easy to move it. There are different versions of this; white twigs, metal flowers, etc. I love these things. This is on the wall above the toilet.

Now all that's left is getting some granite in there, and we'll be set! Granite doesn't cost 
that much, honestly, but its something we'll have to plan for and obviously cant do on a whim.

Pumpkin Bread!

Today is an extremely exciting day. Why, you ask? Because autumn decorations are out at Hobby Lobby. Yes--you heard right--the (fake) pumpkins, faux maize, and cinnamon candles are out. I love absolutely everything about Fall--the colors, the warm feeling you get inside, the crafts, the decorations, and the food. There's nothing better than some warm, feel-good food on a crisp Autumn night. To celebrate this exciting day, I'm going to share my favorite pumpkin bread recipe that I got from Joe's aunt Karen. I've passed this recipe on to my mom (who makes mini-pumpkin loaves for everyone and then passes the recipe on to them). This pumpkin loaf, in my opinion, could not get any better--its perfect. The strudel topping to it complements it perfectly and gives a subtle crunch (for lack of a better word). 


Ingredients:
-2 cups of pumpkin (1 lb. can)
-1 cup of oil
-3 cups of sugar
-4 eggs
-1/2 cup of water
-3 1/2 cups of flour
-2 tsp. of cinnamon
-1/2 tsp. of ginger
-1 tsp. of cloves
-1 1/2 tsp of salt (I usually leave this out, but I'm sure it tastes as delicious with it)
-2 tsp. of baking soda
-1 cup of chopped walnuts (optional)

Topping:
Mix 1/4 cup of brown sugar and 1/4 cup of sugar and sprinkle on top of loaves just before baking.

Directions:
-Combine pumpkin, oil, eggs, water, and sugar in a large bowl until well mixed.

-In another bowl, mix together flour, cinnamon, ginger, cloves, baking soda and salt.

-Add flour mixture to the pumpkin mixture and stir until mixed. If desired, add optional nuts and stir.

-Pour into two greased 9x5 loaf pans** (sprinkle optional topping on top if desired) and bake at 350* for 1 hour and 20 minutes--or until a toothpick comes out clean after inserting it in to the center of the loaf.

**If you'd prefer, you can bake them as cupcakes for about 20-25 minutes or as 6 small loaves for about 1 hour.

...You'd better believe that as soon as the Christmas decorations are fully out at Hobby Lobby (by the end of July--they have some out now, but I'll hold off), I'll have a Christmassy recipe to share. I understand that its June--I don't think you guys fully understand my holiday obsession. This blog is gonna get crazy over the holidays with tons of craft, decorating, and recipe ideas. Brace yourselves ;)

Thursday, June 20, 2013

A must-have gift for kids!

Okay--I'm really excited about this one. As you probably read yesterday, my sister and I did a lot of shopping at the Del Mar Fair on Tuesday. We came across these "fish tank bears" and instantly fell in love--these would be the perfect gifts for Maverick and Madison (or any young child, for that matter!). These are such a cute idea and I think they're adorable. The kids haven't gotten them yet--Rachel bought them for their Christmas presents (no--its never too early to start Christmas shopping ;)), so I cant tell you how they liked them--but I know that they are going to be so excited Christmas morning when they open these up.

These will be in Toys R Us worldwide this coming October--so keep a look out--but you can easily buy them online (or if you live local, drop by the Del Mar Fair and buy one--they're offering buy one-get one free).

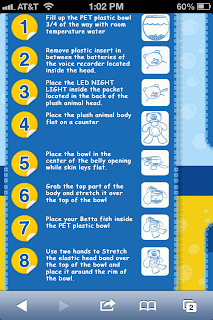
So what are they? They're teddy bears with fish bowls in their bellies. You can choose which bear/animal you want, t
hey come with LED nightlights to put in it, you can choose which color rocks you want, you get a package of bows (if its a girl, they velcro to the ear; if its a boy it velcros to the neck for a bow tie), you get a fish tank net, and a little tree to decorate your fish bowl with. The bear/animal you choose comes with a voice recorder that records up to 10 seconds of audio--the perfect amount of time to say "good night! I love you!" or whatever you want to say. The fish bowl itself is plastic--so there's no risk of breaking it, and the bear can easily be taken off of the bowl for cleaning. The bear comes with a hole in its mouth that leads down to the fish bowl--so to feed your fish, you just put the fish food in the bear's mouth--a perfect task for your kids to help out with. 


We bought this white bear for Madison :)

We bought this brown bear for Maverick :)


These are all of the different animals you can choose from

Here's how easy it is to assemble / disassemble 

These are the different options for the fish tank rocks and the bows
Like I said earlier, we got the white bear for Madison and got pink rocks and the cheetah and polka dot pink bows to accompany it. For Maverick, we got him the light brown bear with green rocks (his favorite color) and the red/green/blue/orange bow ties for his bear. We'll go out and buy some fish the day before we give these to them so that when they open them up, they can use them right away.

Dont want to get your kid a fish? Use it as a piggy bank.. or a candy bowl.. or just a night light. This thing has so many different uses--and its adorable. Obviously its not a fish tank to sit on your kitchen counter--we fully intend on these sitting in the kids rooms.

...adorable, right?! I'm obsessed with these--and I know the kids will be too. If you want to buy one and you aren't in the San Diego area, stop by their website and pick one out--you wont regret it ;)

Wednesday, June 19, 2013

"If you buy now, I'll toss this in for free." SOLD.


Yesterday my sister and I went to the Del Mar Fair--somewhere I hadn't been in about 9 years. I didn't know how much shopping there was there! When I think of the fair, I think about food and rides (although I don't trust those rides and therefore never go on them). The theme of the fair this year was "Game On!" and it was actually pretty cute. They had life-sized versions of all of our favorite games--monopoly, twister, connect four, etc., and it was pretty fun walking around and seeing everything. 


I thought it was a pretty sweet car ;)
I couldn't believe the amount of food this place had--I thought that as soon as I walked through the gates I'd be stuffing my face with food until we left. Thankfully I had some self control (and spent all of my money shopping) so that didn't happen. The scale thanked me this morning ;) 

The first thing I ate as soon as we got there was a chocolate swirl waffle cone ice cream--and it was delicious!


So,  lets get to the shopping. They had stuff EVERYWHERE! I expected there to be lots of stuffed animals and things of that nature (I mean, it is a fair), but I wasn't prepared for the amount of shopping that we would be doing. Something you may not know about me: I'm a HUGE infomercial believer--I would buy it all if I could (however, I've only ever bought one thing off of an infomercial--the Grout Bully--and it turned out to be complete junk. I'll never buy anything from TV again; I'll only get it if they sell it in stores). Basically, the Del Mar Fair is just a plethora of infomercials--and I was sold on all of them. Everything they had was so cool! "Buy now and I'll toss this, this, and this in for free." Boom, sold. It's a good thing I didn't bring any credit cards with me to the fair, because guaranteed they would have been maxed out and I would have come home with a "roll your own sushi maker," a crap ton of toys and clothes for the kids, a massage chair, and possibly a jacuzzi. Most of it, I'll admit, I can live without. This stuff, however, was a purchase I was really excited about. Its an all-natural cleaning product that actually works really well. 


It's called 'Touch of Purple' and it cleans almost everything--except there's no chemicals in it. The lady cleaned my ring, my sunglasses, and my cell phone screen and they all turned out flawless. My ring hasn't been so sparkly in a long time, my sunglasses are staying clean even if I accidentally graze the lens with my finger, and my cell phone stays clean even after talking on it for a while (when before it would have makeup on it). This stuff is cool. I get it that the bottle looks cheesy, but if it works then I don't care how its packaged. This stuff is streak-free and repels fingerprints (I just cleaned my big sliding door window where the kids are constantly getting it dirty, and so far its staying clean. We were told to put a little bit of this in our window washing compartment in our cars and it'll keep the haze off of the windows. Touch of Purple repels dust--so that instead of dusting once a week, you dust about once a month (we'll see how that goes).

All in all, I'm pretty excited about this. I'm hoping it turns out to be everything I want it to be--I'd hate to be duped by a second "infomercial" and lose all faith in these products! I checked it out and you can buy this stuff on their website (www.touchofpurple.com) --or you can head down to the fair and buy some from them and 1) not pay shipping and 2) talk them down on the price and/or get some free stuff tossed in. The best part about this stuff, in my opinion, is that since its all natural, if one of my kids ever accidentally gets into it, it'll send them straight to the bathroom and NOT the hospital. Even though all of my cleaning products are locked up, this still gives me peace of mind.

Not gonna lie, I'm actually pretty excited to clean today ;)

Tuesday, June 18, 2013

Dealing with the baby blues

Having a baby for the first time is a huge change in your life. Having a second baby is an ever bigger change. The second you become pregnant, you'll never be the same. I read somewhere a while ago that even after you've delivered the baby, a tiny amount of their DNA remains inside of you forever. That's kinda cool to think about; because of Maverick and Madison, I have a tiny amount of Joe's DNA in me. That's insane. I never checked snopes.com so I don't know the validity of this, but lets just go ahead and say that its true ;).  

With your body changing so much after having a baby, its extremely common to go through a phase called the "baby blues" --yet its rarely talked about. After having Maverick I was completely fine (minus all of the itching from the allergic reaction to the morphine); I went home from the hospital and didn't take a single pain pill. I thought that because I was fine with my first pregnancy, I'd be fine with my second--and that just wasn't the case. You may have read about my baby blues in my Parenting: Not As Easy As It May Seem post, but I didn't share my tips on how to get through them.


Its crazy to me the amount of women that go through this, yet its almost taboo to talk about it. When I was going through it, I was honestly embarrassed. It was embarrassing--this was my second child, I knew what to do, and I should have been fine. I think I blamed myself for a lot of it even though I had no control over it. Transitioning from one to two kids was hard, but doing it while dealing with the baby blues made it even worse. I felt trapped in my house (it probably didn't help that we lived in our 850 sq ft condo at the time). All I knew was that I needed to get out of the baby blues fast--I was so tired of crying, having anxiety attacks, having no appetite, and feeling overwhelmed. I started trying to figure out where the root of the problem was, and from there I was able to work my way out of it. Here are a few tips that helped me tremendously:

1. Get out of the house. Go anywhere--the park, to a friend's house, to a restaurant--anywhere. I felt trapped inside the walls of my house, and it helped to get out of there.

2. Try to get a good night's sleep. Ask your husband to take over the nighttime feedings as much as he can; if you're breastfeeding, have your husband go get the baby and bring them to you so that you can stay in bed. Getting a good night's sleep is key. I remember at one point, a few days after I had Madison, we packed up the kids and drove over to my parents house that night. I had been hysterically crying all day and just needed to get out. I hadn't slept in about 3 days and was just exhausted. My parents took both kids upstairs and I was somehow talked into taking a Tylenol PM and drinking a small glass of wine. It was enough to take the edge off and I quickly fell asleep. Getting a good night's rest will help you feel refreshed and not bogged down so that you can take on the day.

3. Try to plan a small getaway for the near future. I felt like I was a robot--doing the same thing, every day, over and over. All of the days morphed into one and it felt hopeless. I told Joe that I needed something to look forward to, so we booked a mini kid-less Vegas vacation for a few weeks from then. That helped tremendously. Having something to look forward to and count down to made the days go by quicker, and it helped me to focus on the fact that the days weren't morphed into one; every morning I'd wake up and it would be a new day.

4. Try and get a little 'you' time. Getting out of the house is a great way to disconnect, but getting some 'you' time will help you regroup and clear your mind. It doesn't have to be a whole day; just go out and get a pedicure (you'll get some time alone AND have pretty feet!). You'll definitely come home feeling refreshed.

...guaranteed you know someone who has gone through the baby blues and you just don't know it. No one ever wants to talk about it. Next time someone has a baby, ask them how they're doing instead of how the baby is doing. If they're comfortable enough, they might tell you whats really going on, and maybe you can help them out. Cook them a meal. Offer to babysit or tidy up the house for them. Anything. I'm sure they'll appreciate the gesture.

Luckily for me, the baby blues only lasted a few weeks. For some women it lasts way longer and turns into postpartum depression. Having a baby is no joke. It takes a toll on your health--both mentally and physically. However, it does get better. You just have to figure out how to get there. Sometimes it requires medicine, and sometimes it just takes using a few of these steps I listed to get there. I remember when I was going through it, as soon as I started feeling better, I knew that I wanted to help anyone that was going through the same thing. Constant anxiety attacks and crying for no reason is never fun--and if I could help just one person out then I'd be happy.

Pass this on to anyone you think may be going through a hard time transitioning to motherhood--they may need some words of encouragement. <3

Monday, June 17, 2013

Southwestern Black Bean Salad

With all of the summer barbecues coming up, its great to have lots of options for side dishes to bring. That's where I come in--I love eating, so I can try tons of recipes and tell you which ones are worth making and which ones you should pass on. This is another one of my Pinterest recipes--actually from the same website my zucchini lasagna came from (I'm thinking that I should take a look at this lady's website and go through her recipes--I've loved 2 of 2 so far!). This recipe is for a Southwestern Black Bean Salad--perfect for dipping chips in and using it as a salsa, or serving it as a side dish to compliment your barbecued chicken. This is such a delicious, light, and refreshing salad. Lets get started:


Picture courtesy of skinnytaste.com

Ingredients:
15.5 oz can black beans (rinsed and drained)
9 oz of cooked corn, fresh or frozen (thawed if frozen)
1 medium tomato, chopped
1/3 cup of red onion, chopped
1 scallion, chopped
1 1/2 - 2 limes, juice of
1 Tbsp of olive oil
2 Tbsp of fresh minced cilantro (or more to taste)
salt and pepper
1 medium Haas avocado (I used 3 in mine--just cause I love avocado)

Directions:
In large medium bowl, combine beans, tomato, onion, scallion, cilantro, and salt and pepper to taste. Squeeze fresh lime juice over everything and stir in olive oil. Chill in the refrigerator for 30 minutes. Add avocado just before serving.

Boom, done. So easy, yet so delicious. Here's some nutritional facts (based on if you use 1 avocado instead of 3 like I used) :

Servings: 13  Serving size: 1/2 cup  Weight Watchers Points+: 2 points  
Calories: 79.5  Fat: 3.5 grams  Carbs: 12 grams  Fiber: 3 grams  Protein: 3 grams
Sugar: 1 gram  Sodium: 127 mg (without the salt)  Cholesterol: 0 mg

Sunday, June 16, 2013

A Father's Day Tribute

Happy Father's Day to all you dads out there! I'm so lucky to have an amazing dad and a husband who is an amazing dad to our kids. 

My husband Joe works so hard so that I can stay home with the kids.. and I know at times I complain about how awful the kids were during the day and how I cant wait till they're in school so I can go back to work, but I still feel so blessed to be able to stay home and raise my kids. Its a 'grass is greener' type of scenario; I sometimes complain that I would love to actually go to work, yet I have friends who do go to work who would love the opportunity to stay at home with their kids. When it comes down to it, if I were given the chance to go back to work or stay with my kids, I would absolutely choose being a stay at home mom--and that wouldn't be possible without my amazing husband. I still think its insane what a wonderful life I have; I'm 24 years old, own a beautiful house, have 2 cars, two amazing kids, and enough money to provide us with everything we need plus some luxuries. I owe all of that to Joe. So this post is dedicated to you Joe--I love you more than I could ever express to you and appreciate everything you do for the kids and I. You are such an amazing dad and husband--Maverick, Madison and I all love you so much. You are our rock and we are so proud of everything you have accomplished. Happy Father's Day!


Right after Madison was born <3

...my sexy husband!

...they LOVE taking self pictures with daddy :)


Maverick as a newborn <3


a "special" Home Depot trip with daddy!

At the pumpkin patch!

Maverick really idolizes Joe, and I think its adorable. They're best friends :)

Mav having some fun on daddy's shoulders

...that time we took Maverick to Disneyland (Madison was in my belly!)
Madison loves cuddling with daddy!
...and one for my dad: the best grandpa in the entire world!